So……I am kicking off my great mAirList Upgrade Project :o
My current setup is described in the attachment. What I want to achieve (random order):
• Upgrade mAirList Home version 4.4.7 to mAirList Professional version 4.4.7 on Play Out PC
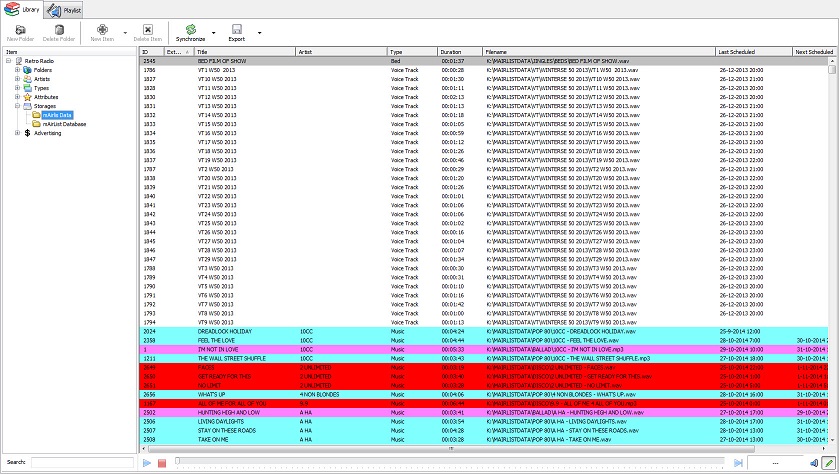
• Migrate mAirList LocalDB and data (songs) on local harddisk to network-based SQL Database on Synology NAS
• Activate mAirList Professional Management on General PC
• Access networked database from Play Out as well as General PC
Later, it must be (easily) possible to upgrade mAirList version 4 to version 5, when V5 beta stage is over.
Torben, can you please state in detail the steps which have to be taken to accomplish the achievements?
If you plan to convert your local DB to PostgreSQL db, I recommend that you make the upgrade to mAirList 5.0 first - it’s almost ready anyway, and it has the required conversion tool built straight into the database GUI (mAirListDB -> Database -> Export -> Clone database).
For the 5.0 upgrade, just install 5.0 on your existing machine (it will keep the 4.4 installation intact), run the configuration and follow the steps to import/upgrade the config.
Ok, here’s the steps I would take to accomplish this migration:
Upgrade your standalone computer from mAirList 4 Home Studio to mAirList 5 Professional Studio, and also upgrade your local database.
Move all audio files to the NAS storage, change storages configuration so that they point to the network drive on the NAS.
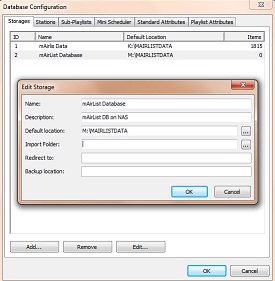
Set up the PostgreSQL server on the Synology so that it can be used from outside, as described in the old blog post I linked above. Create an empty database for mAirList. Don’t create the tables in it yet!
Use mAirListDB (v5) and the Clone Database function to copy the data from your old local database to the new PostgreSQL database.
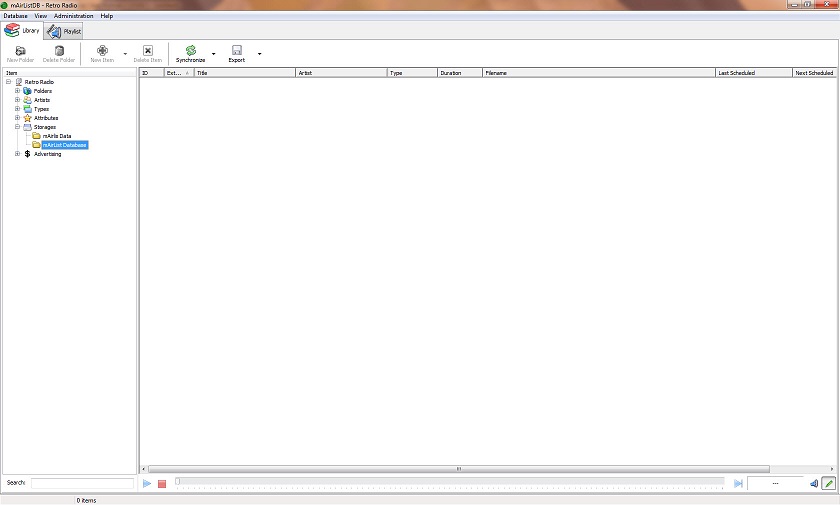
Add the PostgreSQL database as a second database to your mAirList instance, check if everything works.
Remove local DB from the studio instance.
Set up mAirList Professional Management on the second PC.
I propose we discuss this step by step, and you give feedback if the particular step worked before we proceed.
When License Manager opens, click Download and enter your account data to activate
v5 will install in a separate folder with a separate config and will leave the v4 config intact, so you can continue to use the old version until everything is up and running.
To migrate the configuration:
Open mAirList 5 Configuration from the Start Menu. It ask if you want to import the config from an older version. Say yes. (If it doesn’t ask, you can manually go to Advanced -> Upgrade.) Select v4.4 and proceed. All ini files will be copied, and also the mAirListDB database file if it was in the default location (data folder - C:\ProgramData\mAirList 4.4). If the database file was in a different folder, mAirList will not make a copy, but you should make one manually, just in case. (We will upgrade the schema below, which cannot be undone, so you should make a backup copy if you want to have the database file usable for v4.4 later.)
When import is complete, close configuration, then reopen it. All your settings should be there.
Go to Database, double-click the local DB connection, go to the Upgrade tab. Perform the schema upgrade to schema 22.
Close configuration, open mAirListDB app and check if everything works.
Step 2: Move all audio folders (those that are registered as a storage) from your local harddrive to the NAS.
It is important that you move the entire folders and do not rearrange the files in them!
For example, if the old storage was C:\Audio\Music, move the Music folder to the NAS, e.g. \NAS\Audio\Music.
When all folders are moved, open mAirListDB, go to Administration -> Configuration -> Storages, and adjust the Default Location for all storages so that it points to the new folder on the NAS. (You can assign a driver letter to the NAS share first if you want, but it is not necessary, mAirList will also work with UNC paths like \NAS\Audio.)
Restart mAirListDB, then browse through the library and check if the filenames are displayed correctly.
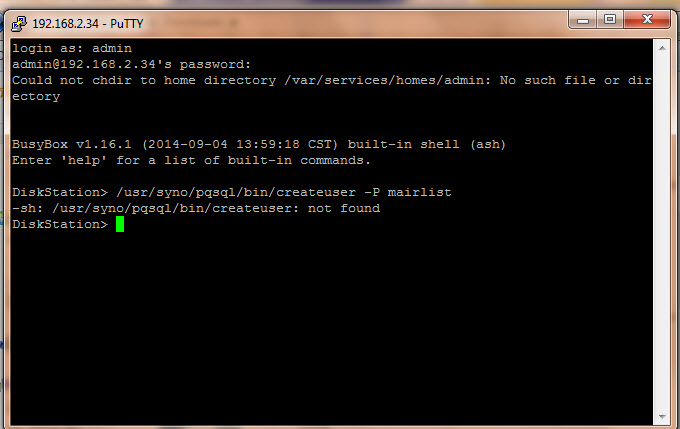
Every DSM has PostgreSQL built in, because it is used internally for the DiskStation applications. The goal is to open the server for other applications
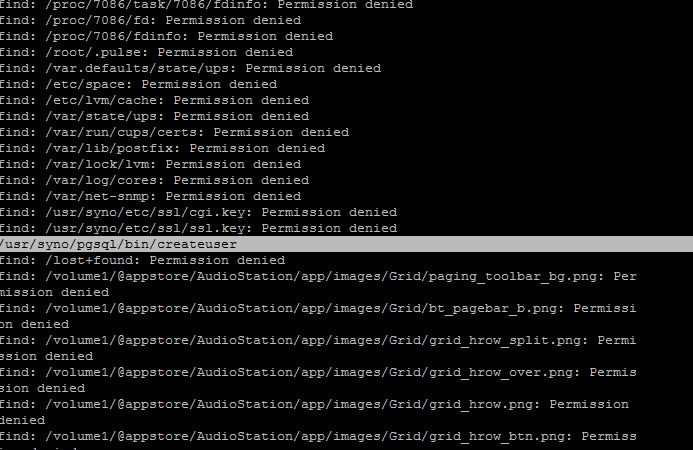
Perhaps your particular DSM version uses a different path for the PostgreSQL files? Try this:
find / -name createuser
It will search the entire filesystem for the “createuser” program and print its full path. (Or nothing at all if it wasn’t fine.)
Be patient, it may take a long time depending on your harddrive size.
I suppose I made a little progress. I think I was able to create the DB and the user “mairlist”, step 1 up to 3 from tutorial “Using a Synology…mAirListDB”.
Now step 4 from this tutorial Edit the file using “VI” as text editor. Please help, where to find this file (command?) and where to find “VI”