If you want fader/button-starts for mAirList (or any other radio playout program), here’s how to do it…
You’ll need a 15way male D connector plus cover, 2x 47kohm resistors, some multicore cable - and whatever connectors your mixer requires. In order for Windows to “see” a joystick on the Game Port you will need to solder the 2 resistors to the back of the 15way connector. Some designs simply have these pins shorted, I’ve not tried it this way - but it appears to work OK.
The pins for the Game Port connector are as follows:
These buttons can then be used with mAirList to perform any supported function in the “Remote Control” section of the config - Or with any other radio playout software. Raduga, for example, will give you: Start, Stop, Break, Next on buttons 1-4 respectively. BCX, DARP, DPS and Myriad are also supported.
Some designs simply have these pins shorted, I've not tried it this way - but it appears to work OK.
As Charlie says, you do need some sort of connection between pins 1, 3, and 6.
These are the pins where an analogue joystick’s “pots” would normally be connected, so as Charlie says, if you don’t connect them at all, the game port driver will ‘think’ there is no device connected, so your buttons won’t work.
For the curious, shorting the pins would make Windows ‘think’ that a real analogue joystick is at one corner of its travel (bottom left I think but don’t quote me on that!).
As usual, it’s wise to fit small capacitors across each of the four buttons to ‘debounce’ the switches and prevent false multiple firing, and/or misfiring.
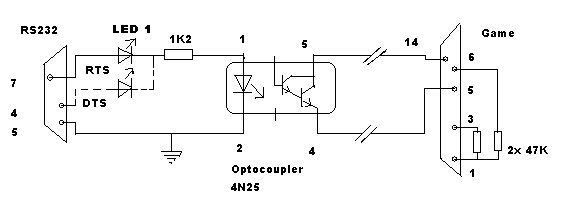
Charlie Davy and Cad Thanks a lot for the information. Please take a look at the following drawing:
RS232 (mAirlist computer) - game (Recording computer)
We record a lot of the live programs to schedule them on some other time. Therefor we use a gamepad to start the recording (pressing button 4 :lol:). btw, this is the only way to start the recording. For the recordings we use a separate computer.
To control my (HAMradio)transceiver with an computer (transmit) I use the part of te drawing with the Optocoupler. Is it possible to use the same to start our recording? I think RTS or DTR needs to be ‘high’ for a short time when I put-in an COMMAND into the ‘top of the hour’ playlist for COM1 or COM3…
Maybe this can be done on some other way. If so, please tel me :lol:
I don’t see any reason why it shouldn’t - Amateur radios PTT operate by a short to ground, and providing the “on resistance” of the opto is low enough to allow the game port to trigger, it should be fine. A year or so ago, I made a little application that engages the serial port - it was a software PTT switch. Download here. This one uses the DTR pin, but I can change it to RTS if you prefer. The VB code is really simple, just a few lines.
Place an MSCom object in a form and use this code for the PTT button:
Private Sub PTT_Click()
If PTT.Caption = "PTT" Then
PTT.Caption = "RX"
Serial.DTREnable = True
Serial.PortOpen = True
Else
PTT.Caption = "PTT"
Serial.DTREnable = False
Serial.PortOpen = False
End If
End Sub
…as you may have guessed, I’m licenced too (M0PZT)…
Please forgive me but I don’t exactly understand the following:
Place an MSCom object in a form and use this code for the PTT button:
Could you please give me more information on how to create a form and placing the MScom object and where to put the code. Do I have to place the code into a script for mAirList?
...as you may have guessed, I'm licenced too (M0PZT)...
Yes, I'm a real HAM too :-) PE2VAV [url=http://pe2vav.nl/]web: pe2vav.nl[/url]
Sorry, I was just referring to Visual Basic - not something you need to worry about, but gave you the code as a reference. No script required, but my little application will produce voltage on the DTR port for you.
Sorry, I was just referring to Visual Basic - not something you need to worry about, but gave you the code as a reference. No script required, but my little application will produce voltage on the DTR port for you.
With the next code I can start the keyer. But how do I switch the DTR on/off with mAirList without pressing the ‘button’ manually? Do I have to put-in a parameter for TX and/or RX? So that I have to load a script for opening and a script for closing the port? Or isn’t it possible to use the keyer for that?
'fraid not - My program is a simple standalone utility. I think Torben is best placed to help you now on - Using the IOPort in mAirList Scripting, you should be able to control the port by sending it “high” or "low.
'fraid not - My program is a simple standalone utility. I think Torben is best placed to help you now on - Using the IOPort in mAirList Scripting, you should be able to control the port by sending it "high" or "low.
Here’s how you toggle the DTR line from within mAirListScript:
You first need to know the IO port range of your serial port. You can look it up in Device Manager. COM1 is usually at $3F8 to $3FF. The DTR status bit is the first bit (1) of the fifth port, i.e., usually $3FC.
The other settings in the device manager should not have any effect. inpout.dll works directly on the IO ports of your hardware. Can you check if there is the correct voltage on the respective pin of the serial port after putting it to high?
I must admit that I have never used the IOPort functions myself - maybe anyone else reading this thread might help you.
There’s one (or two if you’re being ultra-picky!) obvious difference between Charlie’s Visual Basic source code:Private Sub PTT_Click()
If PTT.Caption = "PTT" Then
PTT.Caption = "RX"
Serial.DTREnable = True
Serial.PortOpen = True
Else
PTT.Caption = "PTT"
Serial.DTREnable = False
Serial.PortOpen = False
End If
End Sub
and Vincent’s mAirList script:begin
IOPort($3FC).WriteOR(1);
end.
The mAirList script is setting the bits on the port all right, but it is not opening the serial port afterwards. You need to add a mAirList script equivalent for the VB line “Serial.PortOpen = True” after the WriteOR statement. I hope (?) Torben can provide this, and also the equivalent for “Serial.PortOpen = True,” which you will need for the companion script:begin
IOPort($3FC).WriteAnd(254);
IOPort($3FC) … plus whatever you need to close the port again.
end.
I hope that helps: let me know if it works.
Why would you need to (logically) open the port when you only want to put a certain line to high on hardware level? This makes no sense to me. But it’s worth trying anyway Just add:
I think it depends on how Torbens’ code “talks” to the serial port. My (and many VB apps) would do it through the Microsoft DLL, and that requires the port to be opened first - then you can send the RTS/DTR “high”, about 5volts I’d guess, like the Parallel port (logic levels).
I only offered my code+app as a quick/simple standalone solution for Vincent I’ve had problems with some opto-couplers - Their “on-resistance” hasn’t been low enough to trip a radio into PTT (sorry, going really OT here!) - so his little circuit may need some tweaking. A 5v relay would also work in place of the opto, as would a 2N2222 NPN transistor but you wouldn’t have true 100% isolation, of course.

 Just add: